Discover – I learned that there are 7 layers of maple wood veneer used when making a skateboard. Consisting of 5 long grain boards and 2 cross grain boards.The deck recipe for building a skateboard is 2 long grain 1 cross grain followed by 1 long grain 1 cross grain and finished off with 2 long grain boards. For structural integrity. So the board doesn’t just break apart.

Define – As my Gerry taught us how to apply wood to the skateboard, we started building it. We had different long and cross grains (wood) all to be put in a specific order. The materials we had to shape the skateboard with was glue, an air vacuum along with a piece of foam to give the skateboard its shape. Everyone had 7 minutes to apply the glue, glue the board to each-other and to suck the air out. This was a very tedious task and one that took many days to complete. Once we finished the basic un-designed skateboard it was time to apply our own design to the skateboard.You can’t rush the board you have to use the amount of wood as determined by gerry.

Design –

These were the scanned images that i hand drew and put into Adobe illustrator to print onto a card stock to turn into a stencil.

Develop –

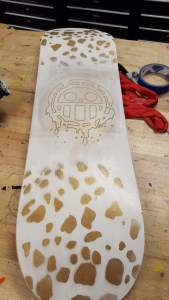
Wood, Wood glue, White wood-stain, Purple wood stain, Card stock, Laser cutter, Spray paint, Orbital sander, Sanding sheet, Kraft, exacto-knife, Tape, Scanner. Since I hand drew my designs, so I had to scan them to my laptop, and then transfer it from photoshop to illustrator and change the image to vector. After that I printed out my designs on a stencil and spray painted them onto the board. Though one of my designs couldn’t be cut, so i had to laser cut it onto my board instead. Also my board warped a bit and i had to clamp it down so it could be flat.


Deliver – My Board, has been stained, has been laser cut, has a stencil, and has been spray painted. That covers practically all the criteria for success. I could’ve blended the stain of my Law. logo better but the way it came out was still pretty good.
Animate for a 2D Animation Blog Post Reflection

Think about some of the tools and procedures you found difficult or easy.

Overall this assignment was very easy and not that challenging. Adding in frames and characters as well as scenes were not at all difficult.  Also the implementation of using the speech bubble in the library and being able to transition a character’s speech within one speech bubble itself.  Making the scene and the characters were easy as well because I didn’t put much detail into them. It was a quickly and rushed project due to obstacles but it was completed fairly fast. What did prove to be a challenge when it came to this project though was first understanding Adobe Flash.  After you get the hang of it, its a breeze and it feels more like a hobby than an assignment.

Learning to Animate for 2D Animation Blog Post Reflection

Unfortunately in this unit I have only completed one assignment. The pac-man animation, so I can really only comment on my experience when creating this animation.  Overall this assignment was not at all hard, at most the hardest thing was perfectly lining up both pac-man and pac-woman up. To be quite honest with certain parts I didn’t care much for equilibrium. Also, another challenging part of this assignment was making the animation up to 150 frames. I ran out of creativity and just started doing random stuff with the pacs What made this procedure easiest though was the core purpose of the assignment, the ability to set guidelines using a ruler. It made it so much easy to line up both “sprites” because you had lines to guide you.

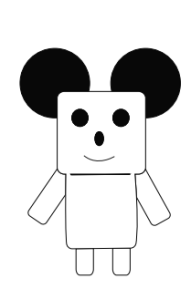
My first 2D Animation “Lonely Mousebot”

Discover and Define

Title: The Lonely Mousebot

Characters: Mousebot, Baby boomer

Setting: The hallway to Mousebot’s house, and the Street.

Mousebot: (thinking) Today’s such a lovely day to go for a walk, the sun is bright and shining, the birds are chirping, and i really need to get out more *whilst getting out of his apartment*

Mousebot: *walks down street 1*

Mousebot: (thinking) This type of day should be shared with others but unfortunately i’m all alone 

Mousebot: (thinking) No one even remembered it was my birthday today.

Narration: After having this great day ruined by such a depressing thought, Mousebot turned back around and decided to spend the rest of the day in his house alone. Just like always. (2)

Mousebot: *Enters his home once more, but this time when he opens the door his old friend baby boomer is in his house*

Mousebot: Jeez! God, boomer you scared the crap out of me. WHAT THE HELL ARE YOU DOING IN MY HOUSE!

Baby boomer: I was dropping by my moms house and decided to swing by, like hell i’d miss my main mans birthday.

Narrator: Once sad, now filled with joy. Mousebot is ecstatic to see his best friend since it’s been so long. Ever since they graduated from college both have lived their lives on very differing paths.


How did you Discover and Define your story?

Honestly when it came to this story, i just picked out surprise party because i assumed it was going to be the easiest to do. Originally i was going to animate Mousebots house and the grocery store as the main scenes, because he was going to go to the supermarket to buy ice cream and junk food to eat by himself in the dark while crying since once again he had nothing to do for his birthday. The ending remained the same though baby boomer comes through and blesses Mousebot with a great day. The story only changed due to me losing my original characters and scenes and having to restart from zero. Originally mousebot was just a robot that resembled the reddit icon, and was going to be referred to as “bot”, and Baby boomer was a small man baby. The face and attitude of a grown man, but the size and physicality of a baby, he even wore a diaper.


Designs

Did you have any challenges in designing your vector drawings in Adobe Illustrator?


Overall, not at all. The set of drawings above took me no little than 35min in total. Considering I only used shapes from the tool selection, it was quite easy. The only hardship comes from the loss of all my data as i previously stated. It delayed my work entirely because i lose the drive to even try in class anymore, but eventually i got my shit together and started working on it once more. At a minimal level of course, but working on it nonetheless.


Development
How was the process of animating your character within Adobe Flash? The process was difficult at first, but thanks to the assistance I received from Ms.Ward, once I got used to using flash, it was a breeze. 

What was the main tool you use to create your animation? The main tool I used when creating my animation was the rounded ellipse tool. I used only the ellipse tool when creating baby boomer for all of his body, arms, legs, eyes, nose, and ears. I also used that tool to create Mousebot when it came to his eyes nose and ears, but everything else with Mousebot was the rounded rectangle tool.

What did you learn when it came to using a timeline that made your animations come to life? I learned that you can use the timeline kind of like a time stamp. Using the library and integrating different keyframes there, you can implement them as you wish in the animation. Thus making the process way more organized.

How do you feel about your final product of the animation? I feel like the final product is amazing considering how fast I did it. Though of course some of the speech bubbles are too small, some go by too fast for the reader to read it, and other small little errors, but again based on the time used i think its great.

Becoming an Animator

Looking back at animation when it was first created to where it is now, there is a large difference. The original form of animation developed in 1832,  used the phenakistoscope. The phenakistoscope was a disc with slits in it. It was placed on a mirror and the slits were used to not blur the image when you spun the disc. The slits were drawn to perform some sort of motion so when you spun the disc the illusion of movement would occur. Two years after the invention of phenakistoscope, the zoetrope was invented. The zoetrope was just like the phenakistoscope just more improved as it was a cylinder instead of a disc, and allowed for more images to be placed in the device, which gave a more realistic motion blur. From then on differing people kept adding on to the craft more and more to the point where sometimes now when you see a video game trailer, you question whether they’re real people or not.

Image result for phenakistoscope

Image result for zoetrope gif

Desk Lamp PT

Discover Stage: I learned that precision is important when cutting wood and that there are many different tools to cut wood. I learned that cutting acrylic sheets are more difficult than wood since it is thicker, more hazards,  while being fragile as well .When dealing with glass. There were different safety precautions for differing tools. For instance, when it came to the bandsaw, students would have to position their fingers in a certain way which you don’t get injured. With the driver drill, you had to position your hands where wind isn’t expelled from the machine, you’d also have to lock the drill when you wanted to pass it along to a fellow student.

Define Stage: Before preparing the wood and the acrylic, we first had to learn the each and every one of the tools available to ensure safety precautions and that we know how to use the. Like what to do, what not do, and how to use them to produce a proficient result. Tools used to prepare the wood and acrylic were: Rulers, Pencils, Sharpies, Bandsaw, Drill/hole-saw, Jigsaw, Tape, and also protective lining Some limitations and constraints that were mentioned before like the time constraints being that we were only allowed to use the classroom which was the source of all the tools. Also, not all the wood pieces were measured exactly. Nor are all of the acrylic pieces. The glue made the blocks slide overnight so the layers wouldn’t be even the next day.

Develop Stage: As for materials to make this design possible I will need the bandsaw, glue, and the drill. I might not be able to curve the edges of the wood like i wanted to but at-least i got the base of the structure down.

Deliver Stage: I believe my finished work does meet all the requirements. I used all available materials to create my cube.

ISMAEL SANOGO – designprocess_worksheet_ScreenPrint

DISCOVER STAGE

What did you learn about Screen printing and the cut paper stencil method?

  • How to find the correct areas to cut so that the picture is clear.

What are 2 other screen printing methods?

  • Drawing Fluid, Photo Emulsion

What tools do you need to use for screen printing?

  • Squeegee, Frame, Shirt, Stencil, Ink.

Define Stage

What were the initial steps in creating and preparing the image that you chose to print? 

  • Steps taken to prepare the original image i chose was turning the image black and white. Then i created islands, which are bridges between the black spots with white lines. Thus creating an area to cut into.

Was it digital? Was it by hand? Was it both? 

  • It was Digital.

Is it necessary for the image to be prepared digitally in order to create a stencil?

  • No, we could have used a drawing and then we could cut out the shaded parts.

What are islands? How did you solve this problem?

  • Islands are the areas of a picture where, when cut, would leave and open hole where there shouldn’t be one. I solved this by tweaking the black with the white.

DEVELOP STAGE

What were the safety hazards & precautions in using the tools? Be specific.

  • I had to be careful with the excato-knifes and the heat gun as to not cut or burn myself, I used caution during this.

Write any problems you have and any changes you made to your designs and why.

  • I had a problem with the shield, most importantly with the island, but I fixed it using outlines

DELIVER STAGE

Does your designs meet the requirements?

My design did meet all my requirements. Though I had islands which messed up and caused an overall bigger island in the wing. So i just used tape, which resulted in my stencil being in great ship and working perfectly while screen printing. But after the screen printing process, I  burnt some parts of my Phoenix and dropped some paint and smudged dots of wet paint on the shirt which resulted in the design looking kind of messy

Compare your design to the requirements you listed in define stage.

Ismael Sanogo- Design Process : Type Sculpture

DISCOVER STAGE:

What did you learn about the anatomy of typography? What are the some of the specific parts of a letterform?

  • The only thing i think i learned about typography would be the legs, and the spine. In particular the legs that come in use of Serifs, and the spine which almost all letters have like an S

Which visual design elements does typography use? Explain how.

  • You could use the legs to provide a stand for the letters which can provide balance. The spine can also be used to provide a slick look visually

What lettering style did you use to design your sculpture?

  • I started building a C but halfway I found that it can also be looked upon as a D

DEFINE STAGE:

What are the 2 main elements that your type sculpture are being graded on (criteria)?

  • Curves, how 3D it looks, and I assume serifs

What were the materials needed to build your type sculpture? What tools did you use?

  • The materials I used were Cardboard, Scissors, Box cutter, Mod Podge, Tape of various kinds, also paper cutouts.

What were the constraints (limitations) in building your type sculpture with low tech and no tech?

  • The tape wasn’t working, it was trash, it IS trash. My model had slim curves, and

DEVELOP STAGE:

List any additional materials (cardstock, wood, plexiglass, or sheet metal, etc.) and supplies (tools) that you need to complete your design.

What problems have you come across when developing your sculpture?

  • My fingers couldn’t fit in certain areas. The glue was sticky yet not, the spine of my letter wouldn’t remain straight.

DELIVER STAGE:

Compare your design to the criteria that you listed in discover & define stages. Does it meet all of the requirements? Explain how. If not, what didn’t it meet and why not?

  • In discover I covered all the criteria points, but with the define portion (Non-existent) i couldn’t complete it, because it was never completed and is TOTALLY non-existent

What changes could you have made to improve your design?

  • I could’ve actually drew part 4, but besides that i could have fixed the curve spine of my letter

DESIGN STAGE

In the end, my letter looked more like a D instead of a C but it still looked good

Final Game Posts

I don’t remember the link for the cte site so I don’t know what to put in each post. Even if I did I don’t think it would be somewhat measurable, I’m just submitting something in hopes that it would somewhat manage to give me a 65. Sorry for wasting your time.

Final Game Plan

This is my game plan

Ill use my collision code and build upon it to make this final game. First ill make sure the images actually come up. Second ill add in rules, and score counter, a health bar, and an end screen to the game.Next I’d also need to add in a background and background music.