Discover – I learned that there are 7 layers of maple wood veneer used when making a skateboard. Consisting of 5 long grain boards and 2 cross grain boards.The deck recipe for building a skateboard is 2 long grain 1 cross grain followed by 1 long grain 1 cross grain and finished off with 2 long grain boards. For structural integrity. So the board doesn’t just break apart.

Define – As my Gerry taught us how to apply wood to the skateboard, we started building it. We had different long and cross grains (wood) all to be put in a specific order. The materials we had to shape the skateboard with was glue, an air vacuum along with a piece of foam to give the skateboard its shape. Everyone had 7 minutes to apply the glue, glue the board to each-other and to suck the air out. This was a very tedious task and one that took many days to complete. Once we finished the basic un-designed skateboard it was time to apply our own design to the skateboard.You can’t rush the board you have to use the amount of wood as determined by gerry.

Design –

These were the scanned images that i hand drew and put into Adobe illustrator to print onto a card stock to turn into a stencil.

Develop –

Wood, Wood glue, White wood-stain, Purple wood stain, Card stock, Laser cutter, Spray paint, Orbital sander, Sanding sheet, Kraft, exacto-knife, Tape, Scanner. Since I hand drew my designs, so I had to scan them to my laptop, and then transfer it from photoshop to illustrator and change the image to vector. After that I printed out my designs on a stencil and spray painted them onto the board. Though one of my designs couldn’t be cut, so i had to laser cut it onto my board instead. Also my board warped a bit and i had to clamp it down so it could be flat.


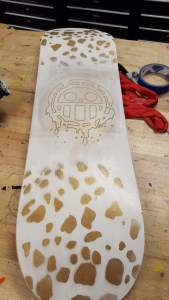
Deliver – My Board, has been stained, has been laser cut, has a stencil, and has been spray painted. That covers practically all the criteria for success. I could’ve blended the stain of my Law. logo better but the way it came out was still pretty good.
Animate for a 2D Animation Blog Post Reflection

Think about some of the tools and procedures you found difficult or easy.

Overall this assignment was very easy and not that challenging. Adding in frames and characters as well as scenes were not at all difficult.  Also the implementation of using the speech bubble in the library and being able to transition a character’s speech within one speech bubble itself.  Making the scene and the characters were easy as well because I didn’t put much detail into them. It was a quickly and rushed project due to obstacles but it was completed fairly fast. What did prove to be a challenge when it came to this project though was first understanding Adobe Flash.  After you get the hang of it, its a breeze and it feels more like a hobby than an assignment.

Learning to Animate for 2D Animation Blog Post Reflection

Unfortunately in this unit I have only completed one assignment. The pac-man animation, so I can really only comment on my experience when creating this animation.  Overall this assignment was not at all hard, at most the hardest thing was perfectly lining up both pac-man and pac-woman up. To be quite honest with certain parts I didn’t care much for equilibrium. Also, another challenging part of this assignment was making the animation up to 150 frames. I ran out of creativity and just started doing random stuff with the pacs What made this procedure easiest though was the core purpose of the assignment, the ability to set guidelines using a ruler. It made it so much easy to line up both “sprites” because you had lines to guide you.

My first 2D Animation “Lonely Mousebot”

Discover and Define

Title: The Lonely Mousebot

Characters: Mousebot, Baby boomer

Setting: The hallway to Mousebot’s house, and the Street.

Mousebot: (thinking) Today’s such a lovely day to go for a walk, the sun is bright and shining, the birds are chirping, and i really need to get out more *whilst getting out of his apartment*

Mousebot: *walks down street 1*

Mousebot: (thinking) This type of day should be shared with others but unfortunately i’m all alone 

Mousebot: (thinking) No one even remembered it was my birthday today.

Narration: After having this great day ruined by such a depressing thought, Mousebot turned back around and decided to spend the rest of the day in his house alone. Just like always. (2)

Mousebot: *Enters his home once more, but this time when he opens the door his old friend baby boomer is in his house*

Mousebot: Jeez! God, boomer you scared the crap out of me. WHAT THE HELL ARE YOU DOING IN MY HOUSE!

Baby boomer: I was dropping by my moms house and decided to swing by, like hell i’d miss my main mans birthday.

Narrator: Once sad, now filled with joy. Mousebot is ecstatic to see his best friend since it’s been so long. Ever since they graduated from college both have lived their lives on very differing paths.


How did you Discover and Define your story?

Honestly when it came to this story, i just picked out surprise party because i assumed it was going to be the easiest to do. Originally i was going to animate Mousebots house and the grocery store as the main scenes, because he was going to go to the supermarket to buy ice cream and junk food to eat by himself in the dark while crying since once again he had nothing to do for his birthday. The ending remained the same though baby boomer comes through and blesses Mousebot with a great day. The story only changed due to me losing my original characters and scenes and having to restart from zero. Originally mousebot was just a robot that resembled the reddit icon, and was going to be referred to as “bot”, and Baby boomer was a small man baby. The face and attitude of a grown man, but the size and physicality of a baby, he even wore a diaper.


Designs

Did you have any challenges in designing your vector drawings in Adobe Illustrator?


Overall, not at all. The set of drawings above took me no little than 35min in total. Considering I only used shapes from the tool selection, it was quite easy. The only hardship comes from the loss of all my data as i previously stated. It delayed my work entirely because i lose the drive to even try in class anymore, but eventually i got my shit together and started working on it once more. At a minimal level of course, but working on it nonetheless.


Development
How was the process of animating your character within Adobe Flash? The process was difficult at first, but thanks to the assistance I received from Ms.Ward, once I got used to using flash, it was a breeze. 

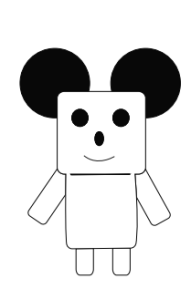
What was the main tool you use to create your animation? The main tool I used when creating my animation was the rounded ellipse tool. I used only the ellipse tool when creating baby boomer for all of his body, arms, legs, eyes, nose, and ears. I also used that tool to create Mousebot when it came to his eyes nose and ears, but everything else with Mousebot was the rounded rectangle tool.

What did you learn when it came to using a timeline that made your animations come to life? I learned that you can use the timeline kind of like a time stamp. Using the library and integrating different keyframes there, you can implement them as you wish in the animation. Thus making the process way more organized.

How do you feel about your final product of the animation? I feel like the final product is amazing considering how fast I did it. Though of course some of the speech bubbles are too small, some go by too fast for the reader to read it, and other small little errors, but again based on the time used i think its great.

Becoming an Animator

Looking back at animation when it was first created to where it is now, there is a large difference. The original form of animation developed in 1832,  used the phenakistoscope. The phenakistoscope was a disc with slits in it. It was placed on a mirror and the slits were used to not blur the image when you spun the disc. The slits were drawn to perform some sort of motion so when you spun the disc the illusion of movement would occur. Two years after the invention of phenakistoscope, the zoetrope was invented. The zoetrope was just like the phenakistoscope just more improved as it was a cylinder instead of a disc, and allowed for more images to be placed in the device, which gave a more realistic motion blur. From then on differing people kept adding on to the craft more and more to the point where sometimes now when you see a video game trailer, you question whether they’re real people or not.

Image result for phenakistoscope

Image result for zoetrope gif

Final Game Plan

This is my game plan

Ill use my collision code and build upon it to make this final game. First ill make sure the images actually come up. Second ill add in rules, and score counter, a health bar, and an end screen to the game.Next I’d also need to add in a background and background music.


Discover: collision.pde

Backstory : It’s about to be winter and the hungry chipmunk has yet to collect all of his nuts. So one day he decides to actually go do it before he starves to death during the winter. Everything is going great, but as soon as the chipmunk got to his normal nut collecting area, an eagle swooped down and tried to grab him.

Point of the game – To collect as many acorns as you can without dying.

How the game ends – Every time the chipmunk collides with the eagle, the chipmunk loses health. if the chipmunk gets hit 5 times it dies.